Create a New Policy
The software can automatically monitor your staffing levels in your dept., and warn you if/when you are under-staffed. These warnings are even included in the request process, so that you can avoid approving a time-off request that would drop you below your minimum for that timeframe.
Your site can have multiple minimum staffing policies, but you'll likely only need one or two, as each policy can have multiple "rules" defined within it.
To begin, go here (Admin Tab -> Shifts & Coverage -> Minimum Staffing)
Like most things in our software, minimum staffing is date-based, therefore you will want to make sure that you have the correct calendar period selected in the dropdown (top-right of the minimum staffing window) when you set up a new policy/requirement.
Next, click the policy dropdown and select "+ add new policy"
The initial setup of a policy is broken into 3 main parts...
A) The groups that should be monitored for working shifts/staffing
Your site can have multiple minimum staffing policies, but you'll likely only need one or two, as each policy can have multiple "rules" defined within it.
To begin, go here (Admin Tab -> Shifts & Coverage -> Minimum Staffing)
Like most things in our software, minimum staffing is date-based, therefore you will want to make sure that you have the correct calendar period selected in the dropdown (top-right of the minimum staffing window) when you set up a new policy/requirement.
Next, click the policy dropdown and select "+ add new policy"

The initial setup of a policy is broken into 3 main parts...
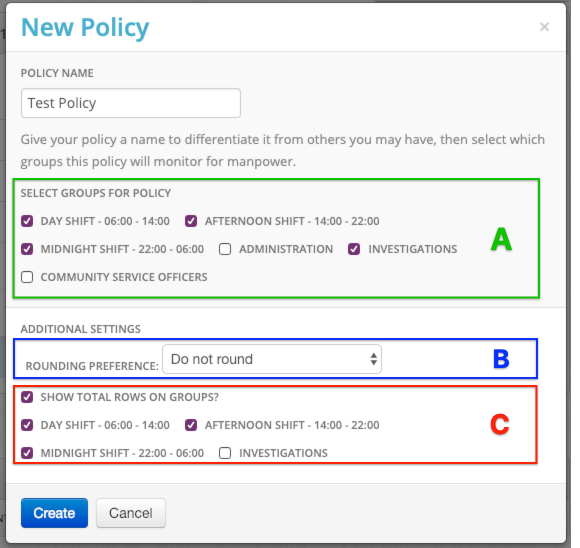
- These are the groups that the system should actually look at to see if eligible people are working.
- The groups you select here do NOT automatically display the staffing levels, they are simply the groups that are "eligible" to contribute to the staffing count(s).
B) Rounding the staffing levels (or not!). You can select from 3 options...
- Do not round: These levels will go into decimals if needed to reflect partial shift coverage.
- Round Down: These numbers will always be rounded down to the nearest whole number.
- Round Up: These numbers will always be rounded up to the nearest whole number.
C) The groups that should actually display the staffing levels
- The groups selected here will have min. staffing rows beneath them on the calendar/grid, with staffing counts & violation warnings.
Define the Staffing Requirements for that Policy
After you create your new policy, you will need to define what the actual staffing requirements are (who, when, how many).
Click the blue "Add Role Requirement" button to begin this process.
D) Job Types that should count toward the staffing count


- Let's say we only want to count the shifts that are actually patrol shifts, not admin or records or something like that; This section allows you to specify exactly that.
- This is useful because perhaps you have 10 "patrol" officers, but one of them actually has the job type of "Community Service Officer (CSO)". You likely wouldn't want that officer to count toward the patrol staffing levels, so you would simply NOT check the "CSO" job type, but still CHECK the "Patrol" job type.
- This behavior will be somewhat mimicked in section E below.
- In my above example, notice how I selected the Patrol and Sergeant job types. By that logic, that means I should also have the "Officer in Charge" (OIC) distinction count towards the staffing level as well, as the OIC is likely filling in for an absent Sergeant.
- Because I've added this OIC OT type to this rule, anytime someone received the OIC OT type, they will included in the count for this rule, even if they aren't a patrol officer or sergeant.
- This is a great way to have your min. staffing adjust "dynamically".
- Let's say you have a min. staffing rule that tallies up all of your working detectives, but you ALSO count detectives as patrolmen; In that case, you'll want to check this box, that way they are tallied into BOTH rules.
- Think of it as if the 2 rules were "sharing" the detectives. If the box was left UNchecked, then the detectives would tally into one rule, but not the other, leading to miscounts and confusion.
- If you do intend to check this box, you'll need to make sure that it is checked in ALL of the relevant rules that you have created. In this detective example, that means I would need to check that box in 2 rules.
- The "Quantity Needed" field is where you state how many people you need for that given rule.
- If the "All Day Requirement" checkbox is checked, then the "quantity needed" will apply to the entire 24 hour day (00:00-24:00).
G cont'd) What if I uncheck the "All Day Requirement" box If the "All Day Requirement" checkbox is UNchecked, it will transform into a "time-block" format, where you can define different staffing requirements throughout the day/night.

- Perhaps your staffing levels need to be the following...
- 3 officers from 00:00 to 8:00 (1)
- 4 officers from 08:00 to 16:00 (2)
- 5 officers from 16:00 to 24:00 (3)
- This time-block format will allow you to set those varying requirements appropriately.
Add Your New Rule to Complete the Setup
Notice how you can see each staffing requirement for this policy, and when it applies.

I've gone ahead and added a second rule to this policy called "CSO's" that tracks CSO's exclusively, as you can see below.

You can always edit a policy or rule after the fact.
- Policy: Select the policy in question from the dropdown and then select "edit policy".
- Rule: Click one of the days for that rule, and you will be able to edit it.
- Rule cont'd: By default, when you click a day, you will only be editing THAT day. If you want your edits to carry through other days in that rule, simply check the boxes for those days at the bottom of the editing menu/form.

Schedule Boosts
USE CASE: Perhaps your normal staffing levels just won't cut it on a holiday, or some other "special" day. Schedule Boosts allow you to set unique staffing levels for particular dates.
- You will need to select one of your existing rules for that policy.
- Next, type in the number of people you need for that date. Keep in mind that this number is replacing the original number for that day, not adding to it. This means you could also lower the manpower requirement for that day, rather than raise it.
- Finally, you will once again be able to specify if this requirement is for the entire 24 hour day, or broken into time-blocks.

Enjoy the Fruits of Your Labor
Now that you have successfully set up one or more minimum staffing policies & rules, head to the Calendar tab. You'll now see one or more Minimum Staffing rows at the bottom of certain Groups (whichever groups you set the policies to display on). These rows tell you the following...
- Total staffing count for that policy/rule for the displayed time block. The time block is listed on the left-most edge of the Minimum Staffing row.
- The cells will turn red if you ever drop below your required staffing levels. You can hover over those red cells to see exactly what timeframe is being violated.
- Right-clicking any of the cells will bring up a more detailed breakdown of who exactly is contributing to that staffing number, when, and will also list the exact hours you are below your required level(s).