First things first: Make sure you have time banks enabled for your dept.'s site. If they aren't and you want them to be, please contact your Pace representative and he/she will enable them for you.
Establishing Time Banks
We first need to create one or more time banks on our site. To do this, head to the admin tab in your dashboard, scroll down to the "Time Banks" section in the sidebar, and select "Time Banks".The page you arrive at will have all of your time banks listed in an index. Obviously we don't have any banks yet, so it's empty, but not for long! Go ahead and click the blue "+ Create Time Off Bank" button in the top-left of the page.

We're now able to specify some details/settings for this bank

- Name: What the bank should actually be called.
- Abbreviation: When the name is too long for certain areas, the abbreviation will be used instead, such as in the user dropdown in the dashboard.
- Time Off Bank Type: This field has 2 options...
- Standard Time Off Bank: Works like you would expect as its own, self-contained bank of hours, from which hours can be withdrawn or deposited in various ways.
- Linked Time Off Bank: Allows you to tie this time bank to another, so that anytime this bank receives a deposit/withdrawal, the linked bank will receive the same deposit/withdrawal.
NOTE: The only exception to this relationship is automatic accruals. These will NOT get relayed to the linked bank. If you want the accruals to be matched by the linked bank, you will need to go to the linked bank and duplicate the accrual rule.
For now, let's stick with the Standard option. The Linked option is essentially the same to set up, except with 2 extra fields that have descriptions already included alongside them on the site.
- Standard Time Off Bank: Works like you would expect as its own, self-contained bank of hours, from which hours can be withdrawn or deposited in various ways.
- Automatic Accrual Rules: These are pre-programmed (by you) deposits that will automatically execute on certain dates or following defined frequencies. These will soon have their very own help doc. explaining them further, as setting them up is its own process that will not be covered here.
- Balance Cap: This will make it so that users can only ever maintain a balance that is equal-to or lesser-than the balance cap. Any hours deposited in excess of this value will simply be ignored.
- Carryover Cap: This acts as a "low-bridge", preventing users from carrying any hours in excess of the cap, over to a new 12 month period.
- Carryover Cap Date: This is the "transition date", that indicates the start of a new 12 month period for the carryover cap. This is the date past which excess hours cannot be carried over. If the carryover cap is the "low-bridge", then this is the point along the highway that the low-bridge is located.
Once you have all of these fields filled out, go ahead and click the blue "Create" button. It may take a few seconds for the page to save since we are creating an entirely new bank. You can create as many time banks as you need. Keep in mind that if you are going to set up a linked time bank, you will need to first set up a standard bank, so that you have a bank to link to in the first place.

Link Time Off Types to the Bank(s)
At this point, our time bank is actually done and ready to carry balances, but we don't want to MANUALLY manage these balances every time someone takes a time-off, earns comp time, etc. though, otherwise what's the point?!What we need to do is link time-off types and overtime types to this bank, so that they are able to update the balance automatically when they occur.
To do this, we actually need to go the the "profile" of each relevant time-off type and overtime type. Let's start with the time-offs...

- In the admin tab sidebar, go to the "Special Types & Designations" section and click "Time Off Types".
- As you can see in the above picture, my example site already has some time-off types created, but they are not yet linked to any time banks.
- NOTE: Time Off Type and OT Type creation will not be covered in this particular help doc. We will only be covering the parts of those processes relevant to time banks.
- NOTE: Time Off Type and OT Type creation will not be covered in this particular help doc. We will only be covering the parts of those processes relevant to time banks.
- I'm going to go into the "profile" for one of these types by clicking its respective "edit" button, in this case I've chosen the "Vacation" time-off type.
- Depending on your site's settings, your item's profile may be longer than the one shown here. Rest-assured you only need be concerned with one field right now, the "Time off bank" field.
- This field lets you select from a list of all of your site's time banks. You are simply going to select the one that this time-off type should be "linked" to.
- Each time-off type can only be linked to a single bank, however one time bank can be linked to multiple time-off types.
- This field lets you select from a list of all of your site's time banks. You are simply going to select the one that this time-off type should be "linked" to.

- Assuming the rest of the profile is filled-out to your liking, you can now save it by clicking the blue "Save" button at the bottom of the page.
- That's it! Now, any time someone uses the "Vacation" time-off type, it will automatically deduct the appropriate number of hours from that person's time bank.
- You will want to do this for each time-off type that needs to affect bank balances.
- Keep in mind that you may have some items (whether they be a time-off or an overtime) that should not be linked to any time bank at all!
e.g. You likely do not charge people's time banks when they need time off for a funeral/bereavement. In this case you would simply leave that time-off type's "Time off bank" field blank. The time off will still work like any other (affect minimum staffing, tracked on reports, etc.), the only difference is this time-off type will not affect time bank balances.
- Keep in mind that you may have some items (whether they be a time-off or an overtime) that should not be linked to any time bank at all!
Link Overtime Types to the Bank(s)
For all intents & purposes, the way we link these to time banks is basically the same as we did for time-off types, therefore my explanation will be slightly abbreviated here.- To edit overtime profiles, we are going to perform the following "moves"... Admin Tab -> Special Types & Designations -> Overtime Types

- The format of this page is identical to the Time Off Types page, so let's go ahead & click the "edit" button for one of them, I chose "OT - Standard".
- Again, depending on your site's settings, your OT profiles may be longer than what is shown in this example, but like before, we are only concerned with a few select fields...
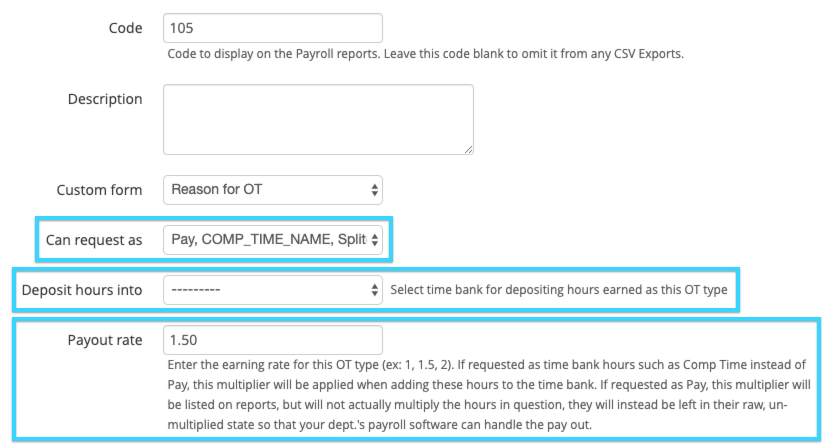
- Can Request as: This determines how the OT shift can actually be earned/accounted for (i.e. Pay Preference). The items you select here determine what will be available for the user to select when they work OT.
IMPORTANT NOTE
"COMP_TIME_NAME" is simply a placeholder label in the following section. It is used for new OT Types since they are not yet linked to a time bank. Once you select a time bank in the "Deposit Hours Into" field below, and save the form, this label will update to match that time bank.
- Pay: Can only be earned as pay.
- COMP_TIME_NAME: Can only be earned as banked hours that are deposited into a specified bank.
- Pay, COMP_TIME_NAME: Can be earned as pay OR as banked hours that are deposited into a specified bank.
- Pay, COMP_TIME_NAME, Split (Pay/COMP_TIME_NAME): Can be earned as pay OR as banked hours that are deposited into a specified bank OR can be split across the two earning methods. The amount that goes into each format can be adjusted at time of request submission.
- Pay: Can only be earned as pay.
- Deposit Hours Into: This is where you actually link the OT type to a time bank. When a user submits a request for this OT type, they will see the selected bank in the request form as well, to keep things clear.
- Payout Rate: This rate only directly affects hours that are requested as comp time. Because those hours are kept within our system in a "closed-loop", it means that we can apply this multiplier immediately.
- e.g. If we have a multiplier of 1.5x, and someone requests 8 hours to be deposited into their bank, those hours will first be multiplied to 12, THEN deposited into the appropriate bank.
- This multiplier does NOT apply to OT requested as Pay. Instead, the requested as pay hours are simply listed on reports in their raw, un-multiplied form.
- This is because pay multipliers are typically applied by your payroll software. We do not want to apply our own multiplier, otherwise it would compound with your payroll software's multiplier, leading to people getting paid more than they should (Although I'm sure they wouldn't complain!).
- e.g. If we have a multiplier of 1.5x, and someone requests 8 hours to be deposited into their bank, those hours will first be multiplied to 12, THEN deposited into the appropriate bank.
- Assuming the rest of the profile is filled-out to your liking, you can now save it by clicking the blue "Save" button at the bottom of the page.
- That's it! Now, any time someone uses this particular overtime type, it will automatically deposit into the appropriate bank (assuming they chose that pay preference that is).
- You will want to do this for each overtime type that needs to affect bank balances.
- Keep in mind that you may have some items (whether they be a time-off or an overtime) that should not be linked to any time bank at all!
e.g. You likely do not charge people's time banks when they need to time off for a funeral/bereavement. In this case you would simply leave that time-off type's "Time off bank" field blank. The time off will still work like any other (affect minimum staffing, tracked on reports, etc.), the only difference is this time-off type will not affect time bank balances.
- Keep in mind that you may have some items (whether they be a time-off or an overtime) that should not be linked to any time bank at all!
Entering Employee Balances
Now that we have time banks established and linked to our time-offs/overtimes, we'll want to enter in everyone's current balances. This can be done via... Admin Tab -> Time Banks -> Employee Balances
You will see a table with everyone in your dept.'s current balances for each time bank. You can edit these balances by clicking the little pencil icon next to the balance you wish to edit.
Just type in their current balance and click the blue check-button, or hit the 'Enter' key on your keyboard. These actually save on-the-fly, so bing-bang-boom we're done!